## What This jordan Sneaker QC Check Solves This checklist is for a [jordan](https://fashion-reps.net/brand/jordan) AJ11-style high-top basketball shoe. The product page describes a patent leather upper, full-length Air Sole unit, carbon fiber midfoot plate, translucent outsole, and a 36–47.5 size range. The goal is not to authenticate the shoe from a few photos, but to complete a documented visual check before ordering: confirm the colorway and size correspondence, verify that the upper stitchi
What This jordan Sneaker QC Check Solves
This checklist is for a jordan AJ11-style high-top basketball shoe. The product page describes a patent leather upper, full-length Air Sole unit, carbon fiber midfoot plate, translucent outsole, and a 36–47.5 size range. The goal is not to authenticate the shoe from a few photos, but to complete a documented visual check before ordering: confirm the colorway and size correspondence, verify that the upper stitching, outsole, and size tag are legible, and then decide whether to accept the current evidence, request additional photos, or hold off on purchasing. 🔎
This does not apply if you need official authentication, need to confirm actual fit and feel, or if the photos cannot prove internal construction, air unit condition, or material composition. QC photos only support comparison of visible items; they cannot replace physical inspection or brand authentication.
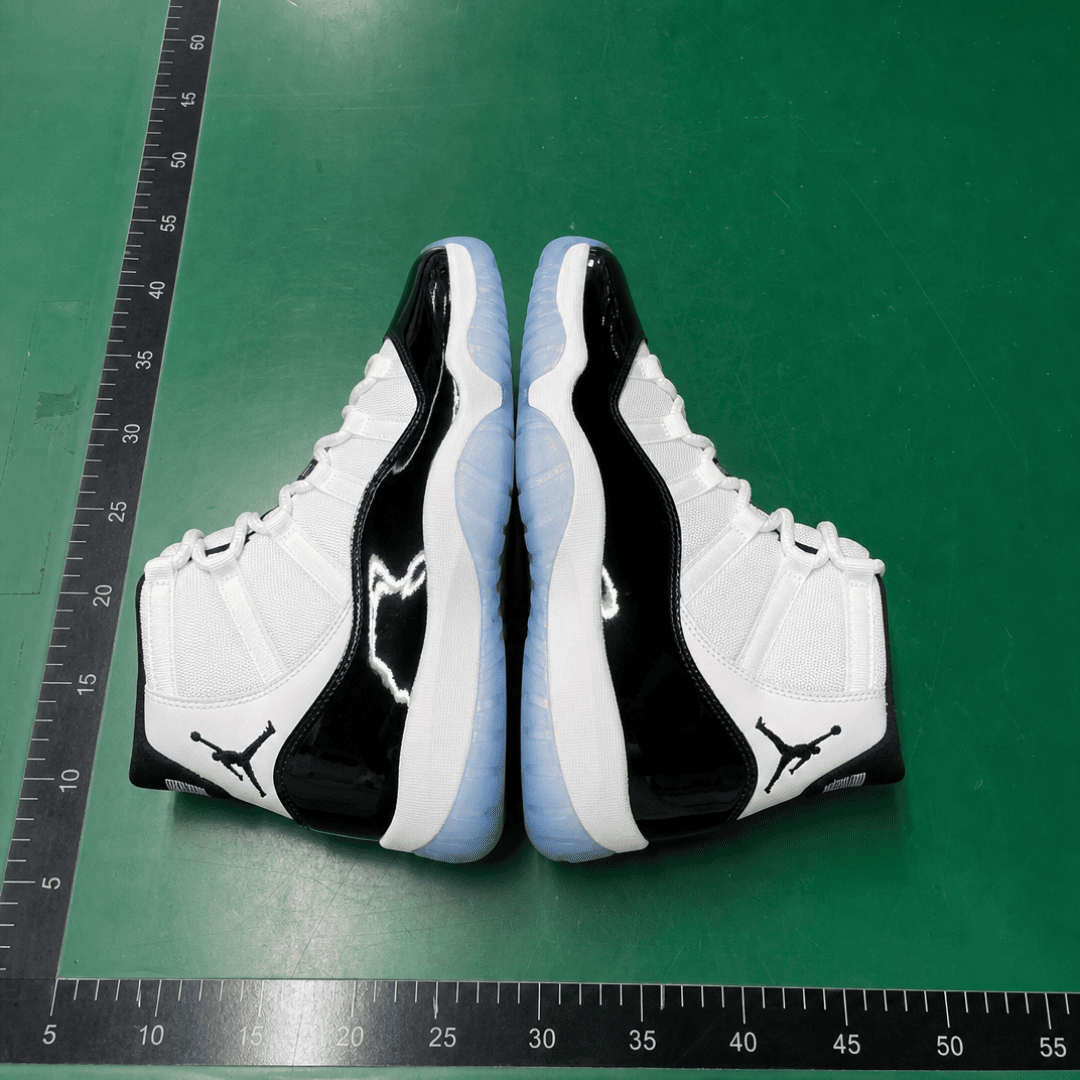
The photos correspond to this item: jordan Patent-Leather Basketball Shoe With a Carbon Midfoot Plate and a 36–47.5 Size Run. The path should be: go to the product details page, click View QC Photos, and then enter the QC photo gallery for that item. Do not use product main images, category images, or other product photos as QC evidence for this shoe.

Caption: QC original photo for the corresponding jordan AJ11-style shoe. The photo is for checking visible details of the current item; it does not constitute a guarantee of authenticity, materials, or overall quality.
First Open the jordan Product Page to Confirm Colorway and Size
Start by checking the product name, colorway, size, and page images on the product details page, then go to View QC Photos. The page lists a size range of 36–47.5, but it skips some intermediate sizes, including 37, 43, and 44. Do not assume every size is available just because the range looks wide.
Record the following before ordering:
- Does the product name match the style you intend to buy?
- Do the QC photos clearly correspond to this specific item, not another shoe from the same brand or category?
- Does the target colorway match the product page and QC photos?
- Is the target size actually within the available options?
- Have price, stock, service fee, and international shipping been reconfirmed on the shopping agent page?
The page gives a reference price of $44.98, but the final item price, service fee, and international shipping are time-sensitive and should be based on the shopping agent page at purchase time. The fact-check date for this page is October 8, 2026; prices and stock should not be considered long-term commitments.
Get QC Photos via View QC Photos for the Corresponding Item
Once in the QC gallery, first confirm the photo context rather than immediately zooming in on a flaw. The photos should let you judge whether they are of the same pair; at least check that left and right shoes, shooting angles, and upper colorway are consistent.
Recommended viewing order:
- First see if photos include both left/right shoes or continuous angles of the same pair.
- Then check the main upper color, patent leather reflection, and midsole color against the product page.
- Next, check for close-ups of toe, side, heel, sole, and size tag.
- Finally, note missing angles; do not fill evidence gaps with another product image.
If photos only show distant shots and you cannot see stitching, glue edges, or size tag clearly, then the only conclusion is "insufficient evidence." Lack of clarity is not itself a flaw, but it increases uncertainty after ordering. 📷
How to Record Upper Stitching, Stitching Lines, and Logo Placement by Angle
Key visible areas for the jordan 11-style shoe include patent leather edges, toe curve, side panel stitching, tongue, and heel logos. When checking, don't just look for obvious damage; also observe whether left and right shoes show similar shape and placement at the same location.
Classify findings into three types:
- Visible fact: Is there a broken stitch, obvious misalignment, glue separation, dent, stain, or surface scratch?
- Comparable fact: Are toe heights, patent leather edges, and logo positions noticeably inconsistent between left and right shoes?
- Editorial judgment: Does a difference exceed your acceptable threshold?
Patent leather reflection changes with lighting and angle, so a highlight in a single photo cannot prove uneven color. Compare left and right shoes at the same angle, and don't mistake reflective areas for fading. Light-colored patent leather may also yellow or discolor over time; that is a long-term wear risk for this model, not proof that the current QC photos show discoloration.
For stitching, check for continuous breaks, obvious skipped stitches, or concentrated loose threads. A few loose threads are not the same as structural seam separation; if you cannot zoom into stitch level, request additional photos rather than marking pass or fail.
Outsole Tread, Edge Glue, and Left-Right Symmetry
First confirm the outsole belongs to this shoe, then check tread, translucent areas, midsole edges, and toe bottom. Translucent outsole color can be affected by the background; don't judge the outsole color from one color-shifted photo.
Record separately:
- Is the outsole tread fully visible, with no large missing areas or abnormal filling?
- Are there continuous glue overflow, visible glue lines, or local openings at the midsole-outsole junction?
- Do left and right outsoles have corresponding tread direction and edge contour?
- Are there obvious deformities at toe and heel bottoms that could affect wear or durability?
The translucent outsole of jordan 11-style shoes is often discussed for long-term yellowing. That is a model-level wear risk, not proof that this pair has already yellowed. If outsole appearance matters to you, request a close-up in natural light before ordering, and record "current color" separately from "possible long-term discoloration." ⚠️
The product description also lists a carbon fiber midfoot plate, but QC photos alone usually cannot confirm the true material and construction of the internal plate. If torsional support is important, ask the seller verifiable questions about the midfoot area instead of treating the text description as independent proof.
What to Check on Tongue, Insole, and Size Tag Against Product Info
The size tag is the most overlooked area for photo verification, yet it's the best place to ask specific questions. When viewing, try to confirm:
- Does the size tag show the target size?
- Is the size format on the tag clearly readable?
- Are left and right size tags consistent?
- Are tag position, printing, and stitching noticeably inconsistent?
- Are there enough close-ups of insole, tongue, and inner space to support judgment?
Don't treat a size tag photo as proof of fit. Product page info suggests this model often runs snug; some buyers go half size up, and wide-foot buyers sometimes consider half to full size up. That is model-level experience, not a substitute for your foot length measurement, internal dimensions, and seller measurements.
If you have wide feet, asking the seller for insole length, internal width, and actual measurements for your target size is more helpful than just the size tag. Without measured data, sizing remains a risk. 📏
What Are Visible Facts vs. Editorial Judgments
The most important boundary in photo checking is not to expand observations into quality guarantees. Use this recording approach:
| Record Type | Can Write | Should Not Write |
|---|---|---|
| Visible fact | Left shoe outsole edge shows a glue line that needs zooming | This shoe is definitely poorly made |
| Missing photo | No clear close-up of size tag | Size tag is definitely wrong |
| Product page description | Page lists carbon fiber midfoot plate | Confirmed carbon fiber inside |
| Editorial judgment | Current evidence insufficient to order | This shoe is absolutely not worth buying |
Similarly, don't claim from QC photos that the shoe is authentic, made of real leather, has working air unit, or is durable. What the current data supports is: how the product page describes this shoe, and whether the photos provide enough visible evidence to check appearance items.
How to Request Specific Additional Photos When Angles Are Missing or Evidence Insufficient
Photo requests should point to an answerable question, not just "take clearer photos." You can ask for:
- Natural light close-ups of left and right toe, to compare patent leather edges, dents, and color.
- Perpendicular close-ups of side panel stitching and seams, to check for continuous broken stitches or obvious skipped stitches.
- Surround close-ups of the midsole-outsole junction, to check for glue overflow and openings.
- Full flat view of the outsole, to compare tread patterns, translucent areas, and left-right symmetry.
- Close-ups of both left and right size tags, to verify target size and label consistency.
- Photos of tongue, insole, and inner space, with measured insole length if necessary.
If the seller cannot provide key area photos, mark that item as "unverified" rather than guessing. For gaps that affect sizing, obvious appearance flaws, or return decisions, resolve them before ordering.
Final Action: Accept Current Evidence, Request More, or Pause Order
You can decide with three outcomes:
- Accept current evidence: colorway, size, and main appearance areas correspond, no obvious issues beyond your tolerance, and you accept that internal construction and long-term outsole changes cannot be proven by photos.
- Request more evidence: critical missing photos on upper, outsole, or size tag, especially when you cannot determine size, glue separation, or obvious left-right differences.
- Pause order: item identity cannot be matched, target size not available, or seller cannot provide key photos that affect your decision.
Good QC photos only reduce uncertainty about visible appearance; they do not guarantee authenticity, fit, durability, or after-sales outcome. If the received item differs from confirmed photos or product info, keep product page, QC photos, chat records, and unboxing evidence, and contact the shopping agent within the applicable return window. Do not undervalue, split orders to avoid duties, or submit false declarations to evade inspection.
The savings from this checklist come mainly from reducing repeated shipping and after-sales communication costs caused by sizing errors, obvious appearance issues, or insufficient evidence; the cost is extra time waiting for photos, checking images, and handling returns. It suits buyers willing to verify photos item by item before ordering; it is not for those needing official authentication, immediate purchase, or full physical testing. ✅
Article Image

Reader extracts
5 approved
Reader score 4.2 / 5 (5 ratings)
Been ordering reps for 3 years and this is more thorough than most. The part about documenting everything before you order is key, screenshots of the listing plus your QC request in the chat. Saved me a refund argument twice. Bookmarked.
northside_kicks 5 / 5
Decent guide, though I feel like QC pics only tell you so much. Lighting hides glue stains and the Air Sole unit is basically impossible to verify from a photo anyway. Still, the stitching check and size range note (36 to 47.5) is useful if you're between sizes.
TyrellW 3 / 5
Good checklist but you skipped the heel tab and the Jumpman logo alignment. On the high tops the logo should sit centered between the heel seam lines. Also ask for a side profile shot with the laces out so you can see the tongue height. Rest is on point though.
hoopstagram 4 / 5
finally someone says out loud that photos cant authenticate a shoe. the colorway/size match trick saved me once, seller sent a 44 label on a 43 box. always ask for the tag next to the box label in the same shot.
Mikael R. 5 / 5
Solid breakdown. I always start with the size tag font and the stitching along the patent leather mudguard. On the AJ11 style highs the carbon plate should catch light like woven texture, not just a flat gray print. One thing I'd add: check the translucent outsole against a white floor, yellowing reads way easier that way.
dunk_on_em_07 4 / 5